VATSIM Setup
- The VATSIM Network
- Essential VATSIM Tools
- Setting Up Your Pilot Client
- Obtaining Pre-Flight Clearance on VATSIM
- Requesting Taxi Clearance on VATSIM
- Pre-Departure and Takeoff Procedures on VATSIM
- Post-Takeoff Procedures and Transition on VATSIM
- Descent and Approach Procedures on VATSIM
- Landing and After-Landing Procedures on VATSIM
- Oceanic Procedures on VATSIM
The VATSIM Network
Founded in July 2001, VATSIM emerged from the collective vision of a group of individuals dedicated to fulfilling the needs of flight simulation enthusiasts worldwide. The initiative aimed to establish an inclusive online community, providing a platform for enthusiasts to connect, while fostering a global community dedicated to learning, sharing experiences, and exploring new opportunities within the virtual aviation realm. This pioneering group is now recognized as the VATSIM Founders, continuing to guide the network's strategic direction.
Organizational Structure
The governance of VATSIM is entrusted to the Board of Governors, comprising individuals tasked with overseeing specific aspects of the network's operations. This board includes Regional Vice Presidents, each representing one of VATSIM's regions, supported by a comprehensive local staff structure. It is noteworthy that all positions within VATSIM are filled by volunteers.
VATSIM's global community is organized into Regions, Divisions, and then local facilities, the names of which vary by location. This hierarchical structure is designed to cultivate and support communities worldwide, providing resources, training, and a forum for sharing the VATSIM experience. Additionally, VATSIM serves as the principal network for numerous established Virtual Airlines and other virtual flying organizations, enriching our skies daily with hundreds of flights.
Our Members: The Core of VATSIM
At the heart of VATSIM are our members, whose participation and engagement are paramount. Members have the freedom to experience VATSIM in their preferred manner, whether through flying, controlling, or both. VATSIM is a platform for everyone, embodying a network that is as diverse and enriching as the members who make it vibrant.
Welcome to VATSIM, a community where your aviation aspirations can soar.

Essential VATSIM Tools
As you prepare to embark on your flight simulation journey, consider integrating a selection of pivotal tools that are extensively utilized by the flight sim community. While the adoption of these tools is at your discretion and not obligatory, they are designed to significantly enhance your flight simulation experience. It's important to note that while some tools offer free versions, others may require a subscription fee.
Navigraph Charts
Chartfox
Chart Fox offers a free chart service that includes a broad selection of navigational charts. While it provides extensive coverage in Europe and the United States, it's worth noting that some global regions may not be as thoroughly covered. For pilots who frequently navigate the skies of these well-serviced areas, Chart Fox presents an ideal solution.
Flowpro (MSFS)
FlowPro reimagines the MSFS user interface by eliminating the standard toolbar and introducing an innovative custom wheel feature. This tool simplifies access to functionalities with a straightforward click, enabling you to customize wheels for different aircraft types. For those looking to further refine their MSFS experience, additional FlowPro widgets are available at flightsim.to, offering enhanced utility and immersion.
Ground Services X (GSX)
GSX offers a highly realistic ground crew simulation, encompassing catering, refueling, boarding, and pushback operations. To achieve a truly immersive experience, users can download specific airport profiles from flightsim.to, ensuring that each airport setup is tailored to the unique requirements of your simulation environment.
Integrating these tools into your VATSIM experience can greatly enrich your flight simulation, providing you with the resources and functionalities needed to elevate your virtual aviation journey.
Setting Up Your Pilot Client
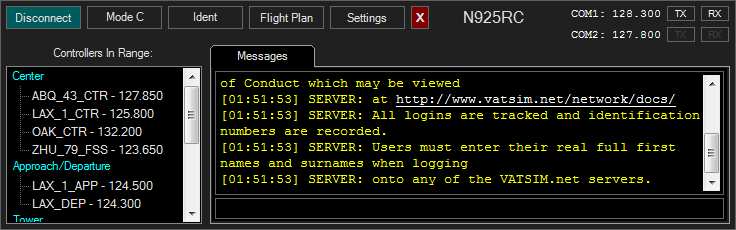
Upon initiating your flight simulation session, a crucial first step involves seamlessly integrating into the VATSIM network through your pilot client, such as vPilot or xPilot. This integration is pivotal for engaging with air traffic control (ATC) and ensuring a realistic flight experience. Here's a guide to effectively setting up your pilot client and initiating communication with ATC.
Initial Steps in Your Simulator:
-
Log into vPilot/xPilot: Start by logging into your chosen pilot client. This is your gateway to accessing the VATSIM network and its array of online controllers.
-
Interface Overview: Upon successful login, you will be presented with an interface that lists available controllers. This interface is intuitive and designed to give you a comprehensive overview of ATC services available in your immediate vicinity.
Establishing Communication with ATC:
The process for identifying which controller to contact depends significantly on the specific airport and its available ATC services. Follow this structured approach to determine the correct point of contact:
-
Ground Controllers: Initially, scroll through the list to check for the presence of ground controllers at your location. If available, promptly set your aircraft's radio to the frequency assigned to the ground controller.
-
Tower Controllers: In the absence of ground control, your next step should be to look for a tower controller. If a tower controller is listed, adjust your radio frequency accordingly to establish contact.
-
Approach/Departure Controllers: If neither ground nor tower controllers are available, the appropriate action is to reach out to approach or departure control. They will guide you in airspace management around the airport.
-
Center Controllers: In scenarios where only the center controller is active, it is imperative to communicate with the center. The center controller will provide instructions for your flight across larger sections of airspace.
Summary:
Obtaining Pre-Flight Clearance on VATSIM
Securing pre-flight clearance is a pivotal step before boarding and starting your aircraft from a cold state on the VATSIM network. This section outlines the procedure for obtaining clearance, ensuring you're ready for an immersive and procedurally accurate flight experience. Click here for our useful VATSIM Que Card.
Preparing for Clearance:
Requesting Clearance:
The format for requesting IFR clearance is straightforward:
Example:
Upon your request, the controller may provide verbal clearance or issue a Pre-Departure Clearance (PDC) via your pilot client.
Example PDC:

Clearance Read-back:
The clearance provided by the controller typically follows this structure:
While receiving clearance, it's a good practice to jot down the details in your pilot client's notes. If clarity is needed, don't hesitate to request the controller to repeat the clearance.
Example Read-back:
Following your read-back, the controller will confirm with "readback correct" or provide necessary corrections.
Final Steps:
This process underscores the importance of clear communication and adherence to ATC instructions for a seamless pre-flight setup on VATSIM, enhancing the realism and enjoyment of your virtual flight experience.
Requesting Taxi Clearance on VATSIM
Requesting Taxi Clearance on VATSIM
Once your pushback is complete and you've coordinated with the ground crew (if using GSX for ground services), your next step is to request taxi clearance from ATC. This procedure is vital for integrating seamlessly into the active airport environment and proceeding to the runway in a manner that ensures both your safety and the efficiency of airport operations. Below is a guide to properly request and confirm your taxi clearance on VATSIM.
Before Requesting Taxi:
Example Request Controlled Airports:
Example Announcement for Uncontrolled Airports:
"Las Vegas traffic, UAL1179, at gate D9, taxing to runway 8L, Las Vegas Traffic."
Receiving Taxi Instructions:
Example Instruction and Readback:
Instruction from ATC:
Your Readback:
During Taxi:
Transition to Takeoff:
Key Takeaways:
Requesting and receiving taxi clearance on VATSIM requires clear communication and adherence to ATC instructions. By following the established protocol and maintaining awareness during taxi, pilots contribute to the smooth operation of virtual airport environments, enhancing the realism and enjoyment of the VATSIM experience for all participants.
Pre-Departure and Takeoff Procedures on VATSIM
Following the transition from Ground to Local frequency and completion of your final pre-departure checks, it's time to initiate contact with the tower for takeoff clearance on VATSIM. The process involves precise communication and adherence to the instructions provided by the air traffic controller. Here's a step-by-step guide to the pre-departure and takeoff procedures:
Initial Contact with Tower:
Example Contact:
Takeoff Clearance Format:
Example Takeoff Clearance:
Example Readback:
Execute Takeoff:
Important Note:
By following these procedures, you contribute to the realistic and organized flow of traffic on VATSIM, enhancing the overall experience for yourself and fellow virtual aviators.
Post-Takeoff Procedures and Transition on VATSIM
As you ascend into the skies, your interaction with air traffic control (ATC) evolves, transitioning from departure control to en-route Center controllers on VATSIM. The following outlines the procedures and communication formats during and after takeoff:
Contacting Departure Controller:
Key Notes:
By following these procedures, you contribute to the realism and efficiency of the VATSIM network, enhancing the overall experience for yourself and fellow virtual aviators.
Descent and Approach Procedures on VATSIM
As you commence your descent towards the destination airport, adherence to proper procedures and effective communication with air traffic control (ATC) is essential. Below are guidelines for navigating the descent and approach phases on VATSIM:
Transition from Center to Approach:
Approach Clearances:
Handoff to Tower:
By diligently following these procedures and maintaining effective communication, you contribute to the realism and efficiency of VATSIM airspace management, ensuring a safe and enjoyable virtual flight experience.
Landing and After-Landing Procedures on VATSIM
Successfully completing your flight on VATSIM involves careful execution of landing and post-landing procedures. The following outlines the steps to be taken during and after landing, ensuring a smooth conclusion to your virtual flight:
Landing Procedures:
Prior to landing, Tower will issue your landing clearance, including wind information and the cleared runway once you have contacted them.
Example Contact From Pilot:
[Controller ID], [Your Callsign], [What approach and runway you are flying].
Houston Tower, UAL1179, established ILS runway 08R
Example Instruction From Tower:
[Pilot Callsign], [Controller ID], [wind information], [Runway], [landing clearance/instructions]
UAL1179, Houston Tower, winds are 170 at 5, runway 08R, Cleared to land.
Example Readback From Pilot:
[Clearance], [Runway], [Any instructions if given], [Pilot Callsign]
Cleared to land, Runway 08L, UAL1179
Cleared to land, Runway 08,Exit left and Hold short taxiway FA, UAL1179
Contact with Tower after Landing:
After landing and rollout, promptly exit the runway as directed by ATC. Tower will then instruct you to contact Ground or provide temporary instructions for runway crossings. Instructions may be given on the initial contact with tower, or they may wait until you touch down.
Example Instruction From Tower on Rollout:
[Callsign], [left/right] when able, [taxi instructions], contact ground [frequency].UAL1179, exit left when able, hold short FA, Contact ground on 121.625
Example Readback From Pilot:
[Vacating Instructions], [Taxi instructions], [Freq. Instruction], [Callsign]
Exit left when able, hold short FA, contact ground on 121.625, UAL1179
After Exiting Runway:
Houston ground, UAL1179, holding short AE, parking at C5
Gate Selection:
Taxi Instructions to Parking:
After-Landing:
Conclusion:
By meticulously following these procedures, you wrap up your virtual flight on VATSIM in a realistic and professional manner. These steps contribute to the overall efficiency and immersion of the virtual airspace, enhancing the experience for both pilots and controllers. Congratulations on completing another successful flight for FlyUnitedVirtualAirlines!
Oceanic Procedures on VATSIM
Obtaining Oceanic Clearance:
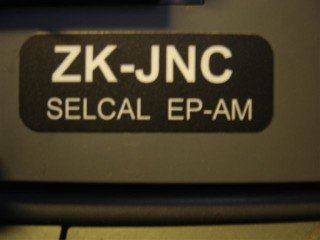
Special Oceanic Procedures: SELCAL:
Special Oceanic Procedures: Position Reports:
Special Oceanic Procedures: Radio Telephony:
North Atlantic (NAT) Oceanic Procedures:
Pacific Oceanic Procedures:
By adhering to these procedures, pilots contribute to the orderly and safe flow of traffic over oceanic airspace on VATSIM, enhancing the realism of their virtual flights.